Български
  Čeština
  Dansk
Dansk  Deutsch
  Eesti
Eesti  Español
  Français
  Ελληνικα
  Hrvatski
  Italiano
  Latviešu
  Lietuviškai
  Magyar
  Nederlands
  Norsk bokmål
  Polski
  Română
  Русский
  Slovenčina
  Slovenščina
  简体中文
简体中文  Tagalog
  Tiếng Việt
  العربية
  Português


-
![Roman Bosch]() It’s a pleasure to have a great portal that improves our customer service.Roman Bosch
It’s a pleasure to have a great portal that improves our customer service.Roman Bosch![Partly]()
-
![Christine Preusler]() LiveAgent empowers our agents to provide better, faster, and more accurate support.Christine Preusler
LiveAgent empowers our agents to provide better, faster, and more accurate support.Christine Preusler![HostingAdvice]()
-
![Karl Dieterich]() LiveAgent helped us to achieve 2 important goals: increase customer satisfaction and sales.Karl Dieterich
LiveAgent helped us to achieve 2 important goals: increase customer satisfaction and sales.Karl Dieterich![Covomo]()
-
![Hendrik Henze]() We have been using LiveAgent since August and we are really satisfied with it.Hendrik Henze
We have been using LiveAgent since August and we are really satisfied with it.Hendrik Henze![HEWO Internetmarketing]()
-
![Razvan Sava]() Since we are using LiveAgent our response time improved by 60%.Razvan Sava
Since we are using LiveAgent our response time improved by 60%.Razvan Sava![Webmaster Deals]()
-
![Taras Baca]() Our paid customer conversion rate went up 325% the first month we've set up and actively started using LiveAgent.Taras Baca
Our paid customer conversion rate went up 325% the first month we've set up and actively started using LiveAgent.Taras Baca![XperienceHR]()
-
![Andrej Ftomin]() I have to say, I have never experienced such a professional customer approach.Andrej Ftomin
I have to say, I have never experienced such a professional customer approach.Andrej Ftomin![TAZAR Group]()
-
![Matt Janaway]() We find LiveAgent to be the best live chat solution by far.Matt Janaway
We find LiveAgent to be the best live chat solution by far.Matt Janaway![The Workplace Depot]()
-
![Viviane Carter]() We use LiveAgent on all of our ecommerce websites. The tool is easy to use and improves our productivity.Viviane Carter
We use LiveAgent on all of our ecommerce websites. The tool is easy to use and improves our productivity.Viviane Carter![CSI Products]()
-
![Christian Lange]() With LiveAgent we’re able to give our customers support wherever they are.Christian Lange
With LiveAgent we’re able to give our customers support wherever they are.Christian Lange![Lucky-Bike]()
-
![Jens Malmqvist]() I can recommend LiveAgent to anyone interested in making their customer service better and more effective.Jens Malmqvist
I can recommend LiveAgent to anyone interested in making their customer service better and more effective.Jens Malmqvist![Projure]()
-
![Catana Alexandru]() I'm sure we would spend 90% of our day sorting through emails if we didn't have LiveAgent.Catana Alexandru
I'm sure we would spend 90% of our day sorting through emails if we didn't have LiveAgent.Catana Alexandru![Websignal]()
-
![Jan Wienk]() With LiveAgent we are able to keep our players happy by offering more efficient support resulting in higher return rates.Jan Wienk
With LiveAgent we are able to keep our players happy by offering more efficient support resulting in higher return rates.Jan Wienk![All British Casino]()
-
![Allan Bjerkan]() LiveAgent is reliable, reasonably priced, and simply a great choice for any fast-paced online business!Allan Bjerkan
LiveAgent is reliable, reasonably priced, and simply a great choice for any fast-paced online business!Allan Bjerkan![Norske Automaten]()
-
![Sissy Böttcher]() We like it because it is easy to use and offers great functionality, such as useful reporting features.Sissy Böttcher
We like it because it is easy to use and offers great functionality, such as useful reporting features.Sissy Böttcher![Study Portals]()
-
![Peter Koning]() We love LiveAgent - it makes supporting our customers easy.Peter Koning
We love LiveAgent - it makes supporting our customers easy.Peter Koning![TypoAssassin]()
-
![Aranzazu F]() We like to offer our customers the best support experience. That’s why we chose LiveAgent.Aranzazu F
We like to offer our customers the best support experience. That’s why we chose LiveAgent.Aranzazu F![Factorchic]()
-
![Rick Nuske]() From setup to ongoing support and everything else in between, the team at LiveAgent continues to impress.Rick Nuske
From setup to ongoing support and everything else in between, the team at LiveAgent continues to impress.Rick Nuske![MyFutureBusiness]()
-
![Vojtech Kelecsenyi]() LiveAgent saves us hundreds of precious minutes every day by making customer service clear and in order.Vojtech Kelecsenyi
LiveAgent saves us hundreds of precious minutes every day by making customer service clear and in order.Vojtech Kelecsenyi![123-Nakup]()
-
![Rafael Kobalyan]() Unlimited agents, email, social media, and phone integration. All that for less than we were paying with our previous provider.Rafael Kobalyan
Unlimited agents, email, social media, and phone integration. All that for less than we were paying with our previous provider.Rafael Kobalyan![Betconstruct]()
-
![Martin Drugaj]() We’ve been using LiveAgent since 2013. We can't imagine working without it.Martin Drugaj
We’ve been using LiveAgent since 2013. We can't imagine working without it.Martin Drugaj![Atomer]()
-
![Ivan Golubović]() It's a cost-effective solution that can help you with a large amount of support requests via different channels.Ivan Golubović
It's a cost-effective solution that can help you with a large amount of support requests via different channels.Ivan Golubović![AVMarket]()
-
![Rustem Gimaev]() Answering emails from Outlook was so hard to manage. With LiveAgent we're sure every email is answered in time.Rustem Gimaev
Answering emails from Outlook was so hard to manage. With LiveAgent we're sure every email is answered in time.Rustem Gimaev![Antalya Consulting Language Center]()
-
![Randy Bryan]() LiveAgent is so awesome. With very little time and effort I had it up and running smoothly in a few...Randy Bryan
LiveAgent is so awesome. With very little time and effort I had it up and running smoothly in a few...Randy Bryan![tekRESCUE]()
-
![Timothy G. Keys]() I highly recommend the LiveAgent product, not only as a Kayako alternative but a much better solution with added value.Timothy G. Keys
I highly recommend the LiveAgent product, not only as a Kayako alternative but a much better solution with added value.Timothy G. Keys![Marietta Corporation]()
-
![Mihaela Teodorescu]() The support team always responded promptly with quick to implement solutions.Mihaela Teodorescu
The support team always responded promptly with quick to implement solutions.Mihaela Teodorescu![eFortuna]()
-
![Hilda Andrejkovičová]() It helps us categorize the nature of the tickets and statistically track what our clients need most.Hilda Andrejkovičová
It helps us categorize the nature of the tickets and statistically track what our clients need most.Hilda Andrejkovičová![TrustPay]()
-
![Alexandra Danišová]() We see LiveAgent as a great tool for communicating with customers.Alexandra Danišová
We see LiveAgent as a great tool for communicating with customers.Alexandra Danišová![Nay]()
-
![Samuel Smahel]() LiveAgent sped up our communication with our customers and gave us an option to chat with them as well.Samuel Smahel
LiveAgent sped up our communication with our customers and gave us an option to chat with them as well.Samuel Smahel![m:zone]()
-
![David Chandler]() Simply put - LiveAgent beats everything out there at this, or even higher, price-points.David Chandler
Simply put - LiveAgent beats everything out there at this, or even higher, price-points.David Chandler![Volterman]()


What is call center software
Call center software is a technological solution that helps businesses manage their customer support operations, typically through handling inbound and outbound communications. This software is designed to streamline the process of managing calls, emails, chats, and other customer interactions, improving efficiency and customer satisfaction. It offers features such as automated call distribution, interactive voice response (IVR), call recording, analytics, and reporting.
These features enable call centers to track performance metrics, monitor service levels, and ensure efficient resource management. By automating various tasks and offering integrations with customer relationship management (CRM) systems, call center software allows support agents to provide more personalized and effective customer service.
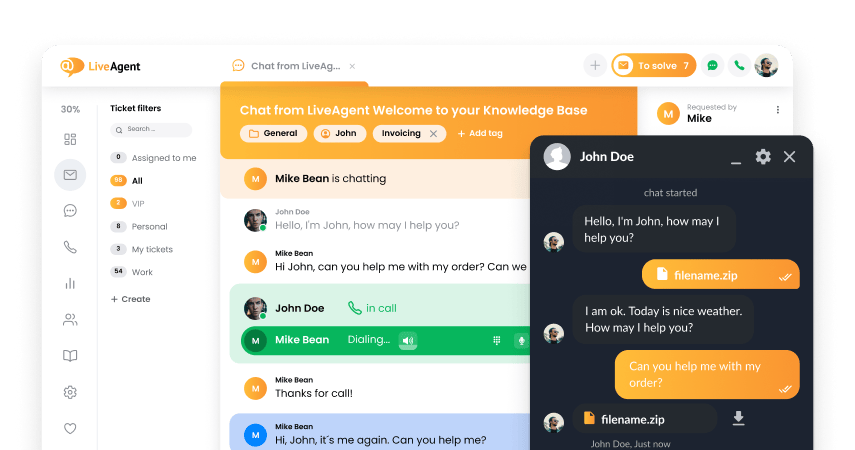
LiveAgent is a popular example of call center software that delivers a comprehensive suite of features tailored for customer service operations. It is an omnichannel helpdesk software that integrates multiple communication channels including voice, email, live chat, and social media, into a single platform. This helps businesses offer consistent and personalized support no matter how customers choose to contact them.
Key features of LiveAgent include:
- Ticket management: Converts all customer queries into tickets that can be managed from a single interface.
- Automated call distribution: Routes calls to the most suitable available agent based on predefined criteria.
- IVR: Interactive Voice Response allows for automated handling of customer calls, directing them to appropriate departments or providing self-help options.
- Live chat: Offers real-time communication with customers directly through the website.
- Analytics and reporting: Provides detailed insights into customer service performance, agent activity, and ongoing trends.
Benefits of call center software
Let’s have a look at some of the benefits a call center system can bring to your business.
Excellent customer experience
The truth of the matter is that picking up a phone and talking to an expert is way quicker and easier than writing long emails trying to come to a solution. Customers appreciate their inquiries resolved quickly without the need to wait hours, sometimes days, for a response from your customer service team . Sprinkle in a bit of personalized care and friendliness from the staff, and you’re looking at satisfied customers who look forward to doing business with you again.
Increased conversions
It’s well-known that engaged customers buy more frequently and are willing to spend more per transaction. Reliable call center software helps keep your clients satisfied and engaged with your business.
Improved customer service management
Working hand-in-hand with other business applications, call center software enables you to always stay on top of your customer interactions, solutions to their issues, and more. It helps your team stay organized and focused even on busy days.
Multichannel support
Various call center software can be connected to email, live chat, SMS, social media, and more to help you provide a holistic customer experience.
Better security
Keeping customer data safe is one of the most important aspects of running a successful business. Most call center software provides integrated security features and performs actions like instant cloud backup.
Higher KPIs
Call center metrics like average handle time (AHT), first contact resolution rate, call abandonment rate, average hold time, and many others are directly correlated to the call center phone software you use. For example, thanks to your call center system being connected to customer relationship management (CRM), the first contact resolution rate in call centers is between 70-75%.
Call analytics
The more insights you can get, the better. Providing advanced analytics and reports allows you to study call center performance, agent utilization, the average speed of answer, and others. This not only helps you optimize your call center operations but also identifies any outliers among your agents.

Top Call Center Software providers
This section delves into the leading call center software providers, showcasing premier solutions that cater to diverse business needs. From innovative features like AI-driven analytics and omnichannel support to scalable, cloud-based platforms, these top providers set the standard in optimizing customer service experiences. Explore how these cutting-edge solutions can transform the way businesses engage with their customers, improving satisfaction and operational performance.
1. LiveAgent

LiveAgent is a widely recognized call center software that offers a range of features designed to enhance customer support and streamline communication processes for businesses of all sizes. As an omnichannel help desk solution, it integrates various communication platforms, allowing support teams to manage customer interactions from emails, calls, chats, and social media in one unified interface.
Features
Multi-channel integration: LiveAgent supports integration with multiple communication channels, providing a comprehensive solution by bringing together email, live chat, phone support, and social media interactions.
Automated ticketing system: The software’s robust ticketing system helps organize and manage customer requests efficiently. It automatically converts all customer interactions into tickets, which can be sorted based on priority, department, or agent assignments.
IVR and call distribution: Users can leverage the interactive voice response (IVR) system and smart call distribution features to ensure calls are routed to the most appropriate agents, enhancing response times and customer satisfaction.
Real-time chat and analytics: LiveAgent includes real-time chat functionality, allowing agents to communicate instantly with website visitors. Its analytics feature provides insights into agent performance, customer satisfaction, and overall call center efficiency.
Pricing
LiveAgent offers several pricing tiers, allowing businesses to choose a plan that aligns with their specific needs and budget:
- Free plan: Provides limited features suitable for small startups or trials.Small business plan: Priced at $15 per agent per month, this plan includes basic ticket management functionality.
- Medium business plan: Costs $29 per agent per month, adding live chat features on top of ticket management.
- Large business plan: At $49 per agent per month, this plan offers full access to all features, including call center capabilities, social media integrations, and advanced reporting tools.
- Enterprise plan: At $69 a full-scale solution with extra support & exclusive services.
Author’s opinion
LiveAgent demonstrates a well-rounded and flexible solution for businesses seeking to improve their customer support infrastructure. Its ability to integrate different communication channels and convert them into manageable tickets is particularly appealing. The platform is easy to use, making it a suitable choice even for teams new to such software.
The pricing structure is also well-designed, offering flexibility so that businesses can scale their call center operations economically. However, while the extensive feature set is a significant advantage, it’s essential for businesses to assess their specific needs and the time available to invest in training for advanced features.
In summary, LiveAgent stands out for its comprehensive nature and affordability. With thoughtful planning and a willingness to learn its more complex capabilities, it can significantly enhance a company’s customer service framework.
2. Zendesk

Zendesk is a well-regarded customer service software platform, often praised for its call center capabilities. As part of its broader suite of tools designed to enhance customer interactions, Zendesk offers features that streamline and enhance the efficiency of call center operations.
Pricing
Zendesk’s pricing for its call center software starts with a basic package but can become more expensive with additional features and support options. As of the latest available information, pricing might start at around $19 per agent per month for the lowest tier and can increase significantly depending on the features, number of agents, and service level required. There are also free trials available, allowing businesses to test the software before committing.
Author’s opinion
Zendesk is a solid choice for businesses seeking a flexible, feature-rich call center solution that seamlessly integrates with other systems. Its real strength lies in its ability to provide omni-channel support and a user-friendly interface that fosters efficient customer interactions. However, the potential for escalating costs and the need for occasional additional support and training could pose challenges for smaller businesses or those with very tight budgets.
Overall, Zendesk’s call center software offers a comprehensive solution for those willing to invest time in understanding its complexities and potentially, higher tiers of service. For businesses that prioritize integration and scalability alongside a solid customer experience, Zendesk is a compelling option worth considering.
3. RingCentral

RingCentral is a prominent player in the field of cloud-based communications and collaboration solutions, particularly known for its robust call center software capabilities. The platform has gained recognition for its comprehensive suite of features that cater to businesses of all sizes, aiming to enhance customer service operations through flexible and scalable solutions.
Pricing
RingCentral offers several pricing tiers designed to meet a variety of business needs. While the specifics can change, the typical tiers often include:
Essentials: This plan is designed for small teams and offers basic call management features.
Standard: Aimed at small to medium-sized businesses, this tier includes additional features such as automatic call recording and integrations with productivity tools.
Premium: This plan caters to larger businesses with more complex requirements, offering advanced analytics, hot desking, and custom app development capabilities.
Ultimate: The most comprehensive plan, which includes all features available on the platform and is ideal for larger enterprises with extensive call center needs.
It’s important for potential customers to check the latest pricing on RingCentral’s website as they may offer promotions or adjustments to these tiers.
Author’s opinion
RingCentral stands out as a powerful and versatile call center software that meets the needs of diverse business sizes and industries. It excels in providing a cloud-based platform that is both reliable and rich in features, which is crucial for maintaining efficient and effective call center operations. However, potential users should weigh the cost against their specific needs and evaluate whether the suite of features justifies the investment, especially for smaller operations where budget constraints are a consideration.
Overall, RingCentral remains a strong contender in the call center software market, particularly for companies seeking a scalable, comprehensive solution with a solid track record in unified communications.
4. Nextiva

Nextiva is a well-regarded player in the field of call center software, offering a comprehensive suite of features designed to enhance customer service operations and streamline communication within businesses. With a focus on providing robust and reliable solutions, Nextiva’s call center software is part of its broader business communication platform, which integrates various communication tools.
Pricing
Nextiva offers several pricing plans, generally starting with the Essential, Professional, and Enterprise tiers. Prices can range significantly depending on the number of users, the level of customization required, and any additional features opted for. It’s common for their pricing to start at around $35 per user per month for the most basic plans, with more advanced features and capabilities reaching upwards to around $100 per user per month or more. A custom quote is typically provided for businesses to get a more accurate estimate based on their specific needs.
Author’s opinion
In my opinion, Nextiva stands out as a robust call center software solution for businesses seeking a comprehensive and integrated communication platform. Its ability to scale and adapt to various business sizes and needs makes it an attractive option. The comprehensive analytics and easy-to-use interface are significant strengths that can greatly enhance call center productivity and customer service.
However, its pricing complexity can be a hurdle for small businesses or those new to call center technology. Additionally, businesses with very specific customization needs may need to look into additional integrations or consider alternative solutions. Overall, Nextiva is an excellent choice for businesses that prioritize reliability, scalability, and robust support in their call center operations.
5. Cloudtalk

CloudTalk is a cloud-based call center software designed to streamline and enhance customer interactions for businesses of all sizes. It’s particularly useful for companies that need reliable and efficient ways to manage their call center operations without the infrastructure costs and complexities associated with traditional systems. Here’s an i analysis of CloudTalk’s features, benefits, and potential drawbacks, along with insights into its pricing and an opinion on its overall efficacy.
Features and benefits
Omnichannel communication
CloudTalk enables businesses to manage all customer interactions from a single platform, including phone calls, emails, SMS, and live chats. This ensures that customer service representatives can provide a seamless experience across various communication channels.
Advanced call routing
The software offers intelligent call routing features such as skills-based routing, interactive voice response (IVR), and automatic call distribution (ACD). These features help ensure that callers are quickly connected to the most appropriate agent, thereby improving customer satisfaction and reducing wait times.
Integration capabilities
CloudTalk integrates with a plethora of CRM and helpdesk solutions, such as Salesforce, HubSpot, and Zendesk. This integration facilitates efficient data management and allows agents to access customer information in real-time, leading to more personalized service.
Scalability
As a cloud-based solution, CloudTalk can easily scale with your business. Whether you operate a small startup or a large enterprise, you can adjust your call center capabilities as your customer service needs evolve.
Analytics and reporting
CloudTalk provides robust analytics tools that give insights into call center performance. Metrics such as call volume, wait times, and agent productivity can be monitored and analyzed to identify trends and make informed decisions to optimize operations.

Provide excellent customer service
Discover unparalleled customer support with LiveAgent's all-in-one software. Benefit from 24/7 service, a free trial without a credit card, and seamless integration across 130+ ticketing features. Enhance your business with fast setup, AI assistance, live chat, and more. Choose LiveAgent for exceptional service and satisfied customers.


Customer communication management software
LiveAgent customer communication management software will provide personalized, quick, and knowledgeable service to your customers. Try it for free.


Our website uses cookies. By continuing we assume your permission to deploy cookies as detailed in our privacy and cookies policy.