How to set up a call center in LiveAgent: complete step-by-step guide
Complete step-by-step walkthrough: connect your phone number, configure IVR, set up call routing, enable recording, and run your first test call in LiveAgent.
Published on Jun 5, 2026.Last modified on Jun 5, 2026 at 7:35 am
From connecting your first phone number to running a live test call, this guide covers every step of setting up a call center in LiveAgent. Expected time: 2 to 4 hours for a basic setup, 1 day for full IVR and routing configuration. This is a hands-on tutorial for the person doing the setup, not a feature overview.
What you need before starting (prerequisites checklist)
Before you open LiveAgent configuration, confirm you have the following:
A LiveAgent paid plan. Calling is not available on the free plan. The Ticket+Chat plan and above include call center features.
A VoIP provider or phone number. You need either a SIP-compatible VoIP provider account or a phone number purchased through a provider that integrates with LiveAgent. Twilio is the most straightforward integration. For a full list of compatible providers, see the VoIP integrations page.
Agent accounts created. All agents who will handle calls need a LiveAgent account with call permissions enabled.
Business hours defined. You need to know your support hours before configuring IVR routing. Off-hours routing goes to voicemail or a different queue.
IVR structure sketched out. Before building your IVR in LiveAgent, write down the menu structure on paper. Maximum recommended depth: 2 levels. Example: Level 1: Sales, Support, Billing. Level 2 under Support: Technical, Account, Other.
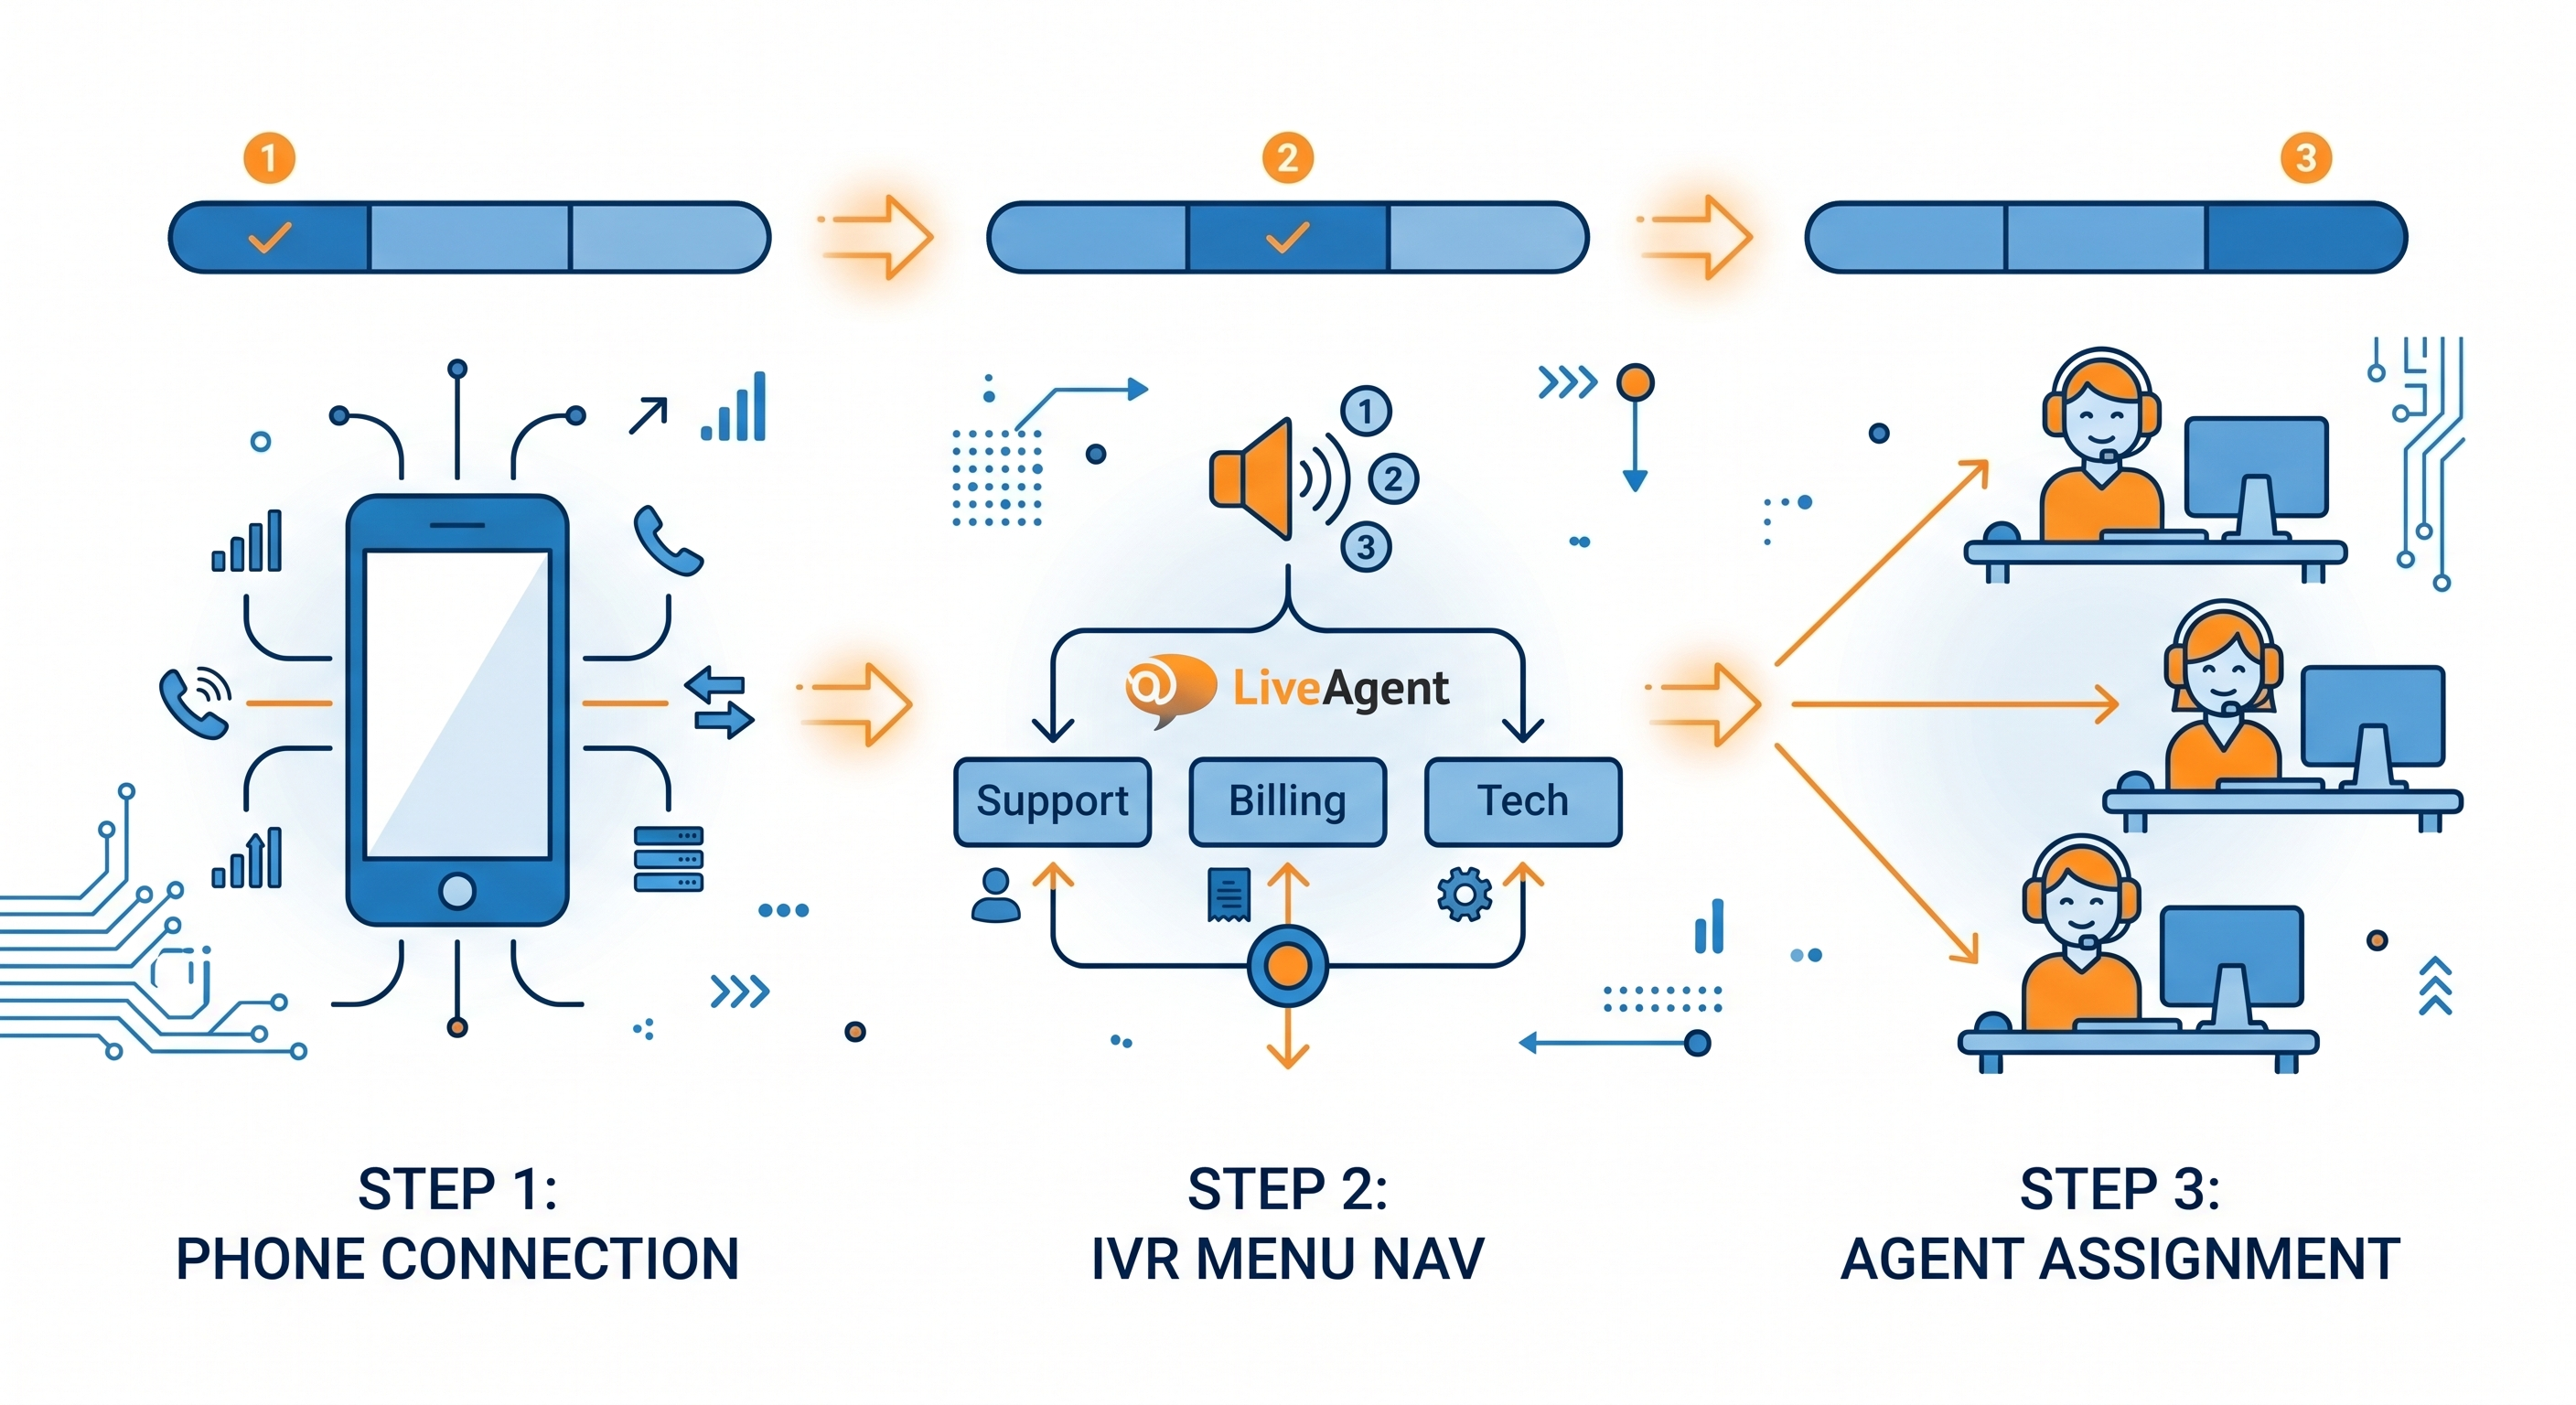
Log in to LiveAgent and go to Configuration (gear icon in the left sidebar).
Select Call Center, then Phone Numbers.
Click Add Phone Number.
Choose your connection method: SIP (for most VoIP providers), Twilio (for Twilio numbers), or LiveAgent native number (if purchasing a number directly through LiveAgent).
For SIP: enter your SIP server address, username, and password from your VoIP provider. For Twilio: enter your Account SID, Auth Token, and the Twilio phone number you want to use.
Click Test Connection. A green status indicator confirms the connection is live.
Save. The phone number now appears in your Phone Numbers list.
If the test connection fails, check that your VoIP provider has whitelisted LiveAgent’s IP ranges. Your VoIP provider’s support team can confirm the correct SIP settings. See the VoIP integrations page for provider-specific setup notes.
Ready to grow your business?
Start your free trial today and see results within days.
Estimated time: 30 to 60 minutes depending on menu complexity.
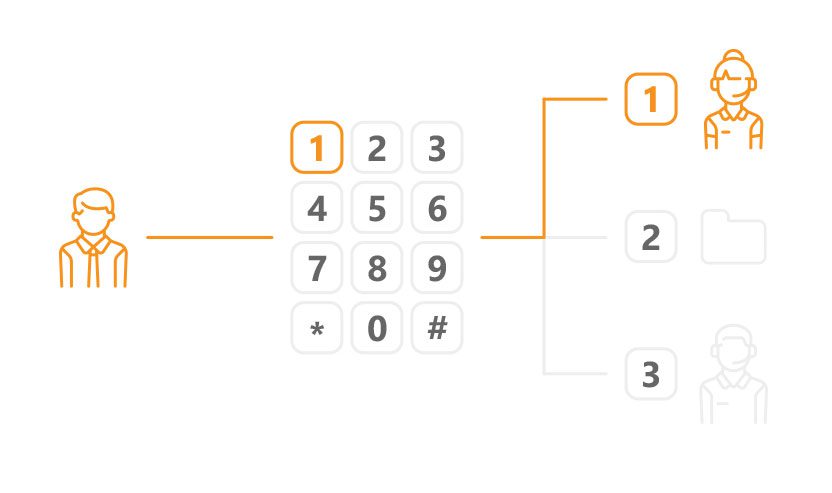
Go to Configuration > Call Center > IVR.
Click Add IVR and give it a name (for example, ‘Main menu’).
Upload or record your greeting message. This plays before the menu options. Keep it under 10 seconds.
Add menu options. For each option: set the key (1, 2, 3), record or upload the prompt (‘Press 1 for Sales’), and choose the destination (a department, a specific agent, or a sub-menu).
For a 2-level IVR: create the sub-menus first, then link them from the main menu as destinations.
Set a default option for callers who do not press anything within 5 seconds (send to main queue or repeat the menu).
Save and assign the IVR to your phone number: go to Phone Numbers, select your number, and set the IVR field to your new menu.
Best practice: keep menu options to 3 to 4 per level. More than 4 options causes caller confusion and increases abandon rate. Test the full IVR flow by calling in before going live.
Step 3: set up call routing and agent groups
Estimated time: 30 to 60 minutes.
Create agent groups
Go to Configuration > Departments.
Create a department for each call type or team (Support, Sales, Billing).
Assign agents to each department. Agents can belong to multiple departments.
Configure routing rules
Go to Configuration > Call Center > Routing.
Choose your routing type per department:
Round-robin — distributes calls evenly across available agents
Ring all — all available agents ring simultaneously, first to answer gets the call
Skills-based — routes to agents tagged with specific skills
Set overflow rules: if no agent is available in the department, route to another department, voicemail, or a callback queue.
Set queue limits: maximum number of callers in queue before routing to overflow. Recommended starting point: 5 callers.
Save routing rules for each department.
Join our newsletter
The latest tips and deals delivered straight to your inbox.
Go to Configuration > Call Center > Call Recording.
Toggle recording on for the departments you want to record.
Set storage duration. Default is 90 days. Adjust based on your compliance requirements.
Configure the recording announcement. In many jurisdictions, you are required to inform callers that the call is being recorded. Set your IVR greeting or department greeting to include this notice.
Compliance note: recording requirements vary by country and industry. In the EU, GDPR requires that callers are informed of recording. In the US, requirements vary by state. In healthcare, additional HIPAA rules apply. Consult your legal team before enabling recording.
Step 5: configure voicemail and callback
Estimated time: 15 to 20 minutes.
Voicemail
Go to Configuration > Call Center > Voicemail.
Enable voicemail for each department.
Upload or record the voicemail greeting.
Set the trigger: voicemail activates when no agents are available, or after a queue wait threshold (for example, after 3 minutes in queue).
Voicemail messages are converted to tickets in LiveAgent automatically, with the recording attached.
Callback queue
Go to Configuration > Call Center > Callback.
Enable callback for the departments where wait times regularly exceed 2 minutes.
Set the callback offer trigger: offer callback after the caller has been in queue for X seconds (recommended: 90 seconds).
Record the callback offer message (‘Your wait time is approximately 3 minutes. Press 1 to receive a callback instead.’).
Callback requests appear as tickets in the queue and are assigned to the next available agent.
Step 6: run a full test call before going live
Do not go live without testing every part of the setup. Use this checklist:
IVR navigation: call in and test every menu path. Confirm each option routes to the correct department.
Routing: have two agents in the same department. Confirm round-robin distributes correctly.
Recording: make a test call, then confirm the recording appears in the ticket. Check that the announcement plays correctly.
Voicemail: set all agents to offline, call in, wait past the queue threshold, and confirm voicemail activates. Check that the voicemail converts to a ticket.
Callback: trigger the callback offer during a test call. Confirm the callback request creates a ticket.
Overflow: set a department to unavailable and confirm the overflow routing activates correctly.
Document any issues found during testing before going live. A failed IVR path or misconfigured overflow rule discovered after launch is significantly more disruptive than catching it in testing.
Going live: first-week monitoring checklist
The first week after launch requires closer monitoring than normal operations. Look for:
Abandon rate by hour: spikes at specific times indicate IVR friction or understaffing during those periods. Check this daily for the first 5 days.
Misrouted calls: review escalation and transfer notes in the first 48 hours. Agents will flag routing errors faster than reports will surface them.
AHT above expected range: elevated AHT in week 1 is normal as agents adjust. AHT more than 50% above your target in week 2 indicates a training or routing issue.
Voicemail volume: high voicemail volume in the first week means callers are not reaching agents. Check queue limits and overflow settings.
Call recording confirmations: spot-check 5 to 10 recordings per day to confirm quality and compliance announcements are working.
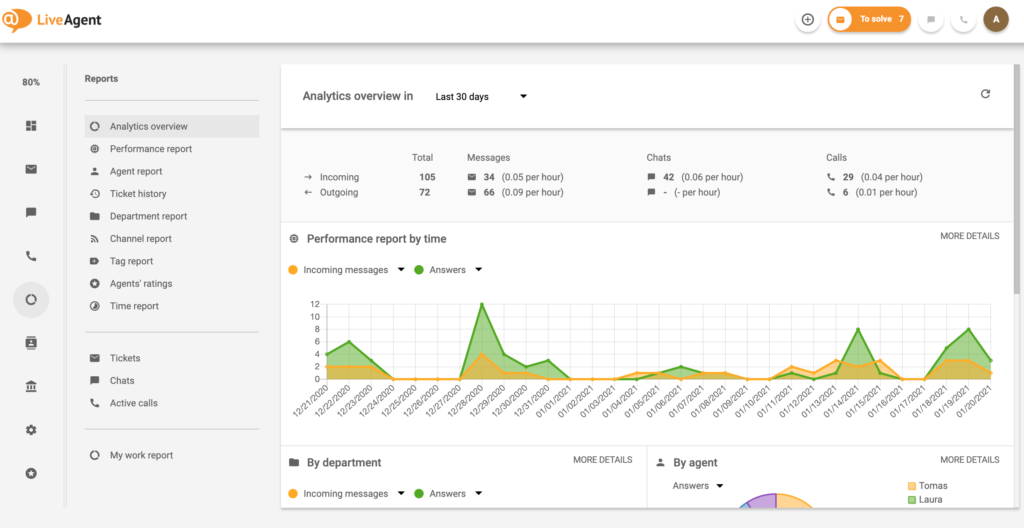
Where to find these metrics in LiveAgent: Reports > Call Reports for AHT and call volume, Reports > Agent Reports for availability and response time, and the live Dashboard for real-time queue status.
Share this article
Frequently asked questions
LiveAgent supports any SIP-compatible VoIP provider. Certified integrations include Twilio, Vonage, RingCentral, and several regional providers. Twilio is the most commonly used for new setups because of its straightforward API key configuration and number availability in most countries. For the full list, see the VoIP integrations page.
Yes, through number porting. You transfer your existing number to a VoIP provider that integrates with LiveAgent, then connect it via SIP. Porting typically takes 2 to 4 weeks depending on the originating carrier and country. Your current provider must release the number. Start the porting process before your trial expires if you plan to use an existing number.
Create the sub-menus first in Configuration > Call Center > IVR. Then create your main menu and set the destination for each top-level option to the corresponding sub-menu. Test by calling in and navigating each path before assigning the IVR to your phone number.
Yes. Recording can be enabled per department with configurable storage duration. GDPR compliance requires informing callers before recording begins, which you configure in the IVR or department greeting. For healthcare teams, additional HIPAA considerations apply.
LiveAgent does not publish a hard cap on queue size. Practically, queues above 20 concurrent agents are unusual in mid-market deployments. The more relevant limit is the queue wait threshold: set overflow to activate when the queue exceeds 5 callers to prevent excessive wait times and abandonment.
You define this in the overflow settings for each department. Options are: hold in queue (with or without a callback offer), route to another department, send to voicemail, or play an out-of-hours message. The recommended configuration is: callback offer at 90 seconds in queue, voicemail after 3 minutes, with email notification to the department manager for any voicemails received during business hours.
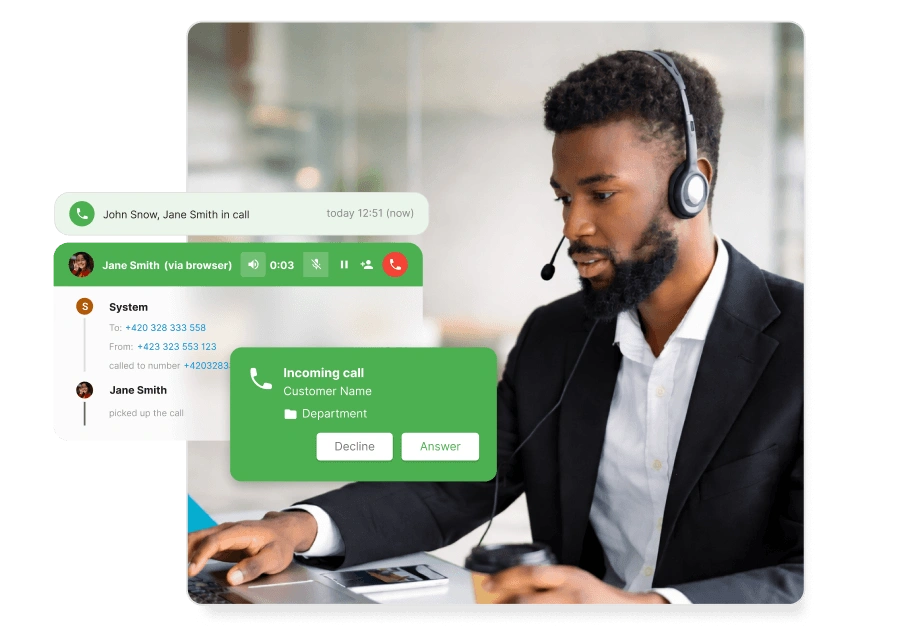
LiveAgent's call center streamlines operations with features like automatic call distribution, recording, and transfers. Easily set up a built-in system, connec...