If you are evaluating whether automation belongs in your support stack, start with understanding what an AI virtual assistant is and how it differs from a traditional rule-based chatbot. Once you are ready to act, this guide walks you through every configuration step inside LiveAgent — no development experience required.
LiveAgent ships with two distinct AI layers: the AI Chatbot, which handles visitor conversations autonomously inside your live chat widget, and the AI Answer Assistant, which accelerates agent replies inside tickets. This tutorial covers both, in the order you should configure them.
Prerequisites: what you need before starting
Before touching a single setting, confirm that every item below is in place. Skipping prerequisites is the most common reason a LiveAgent AI virtual assistant setup stalls mid-way.
- Active LiveAgent subscription on a current pricing plan. AI features are available on all current plans. Legacy plans are excluded — contact support@liveagent.com to confirm your eligibility.
- Administrator access. AI configuration lives inside the admin panel. Agent-level accounts cannot modify these settings.
- At least one live chat button already created. The AI Chatbot is implemented directly into the live chat button — you cannot attach it to a button that does not exist yet.
- A knowledge base with published articles. The AI Chatbot draws answers from your knowledge base. An empty or unpublished knowledge base means the bot has nothing to reference.
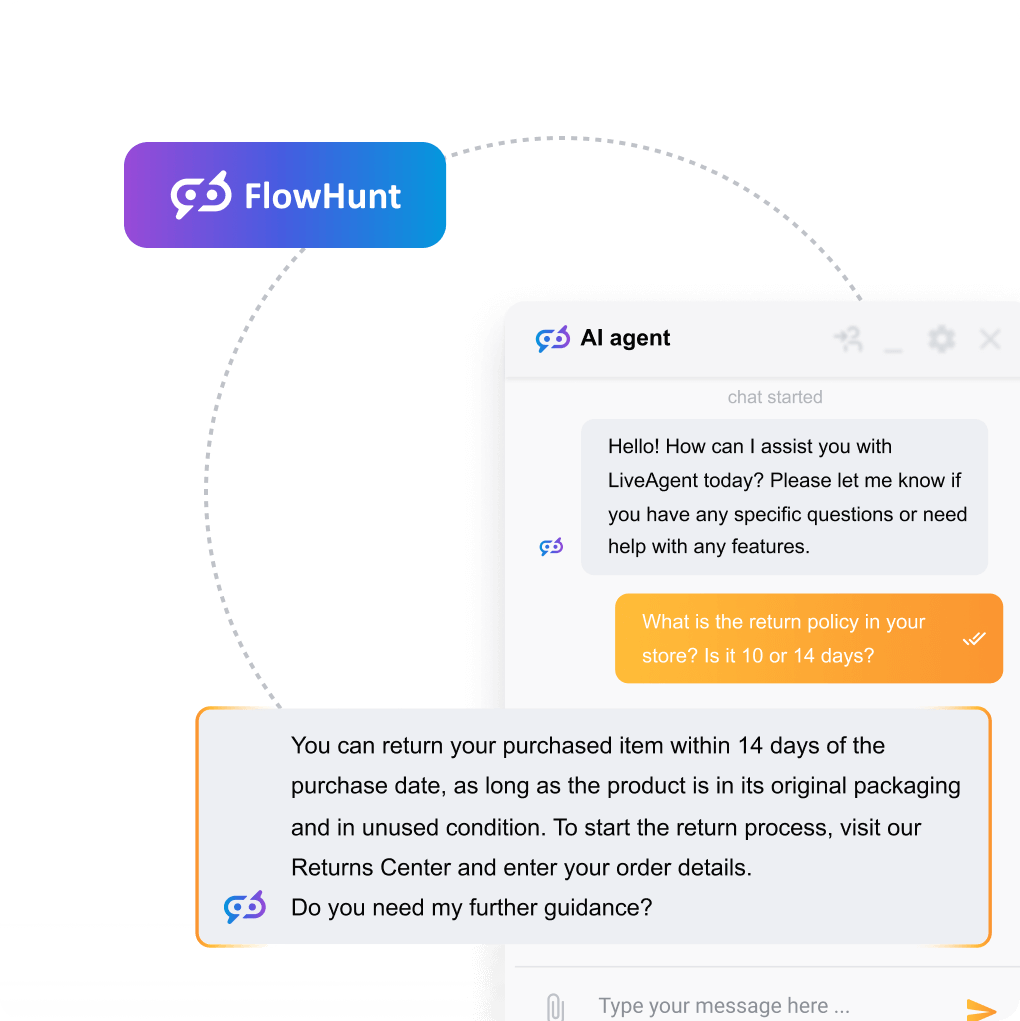
- An API key from OpenAI or an active FlowHunt account. The AI Answer Assistant requires one of these two integrations. If you plan to use FlowHunt (the no-code AI automation platform developed by Quality Unit, the same company behind LiveAgent), you can request a free full setup from the LiveAgent support team once both subscriptions are active.
- At least two human agents available in the relevant department. Escalation rules require a destination. You need live agents to hand off to.
Pro tip — use FlowHunt for persistent AI sessions: When you connect the AI Answer Assistant via FlowHunt, LiveAgent maintains the AI session across every draft modification in a ticket thread. If you connect via OpenAI directly, a new session starts each time an agent modifies a draft, which means the assistant loses prior context. For multi-turn ticket conversations, FlowHunt is the stronger choice.
If you want a broader overview of what the platform’s automation layer can do before diving into configuration, browse the full AI features documentation.
Step 1: enable AI features in LiveAgent
AI features in LiveAgent are not enabled by default. You activate each component separately from the admin panel.
1a. Enable the AI chatbot
- Log in to your LiveAgent admin panel.
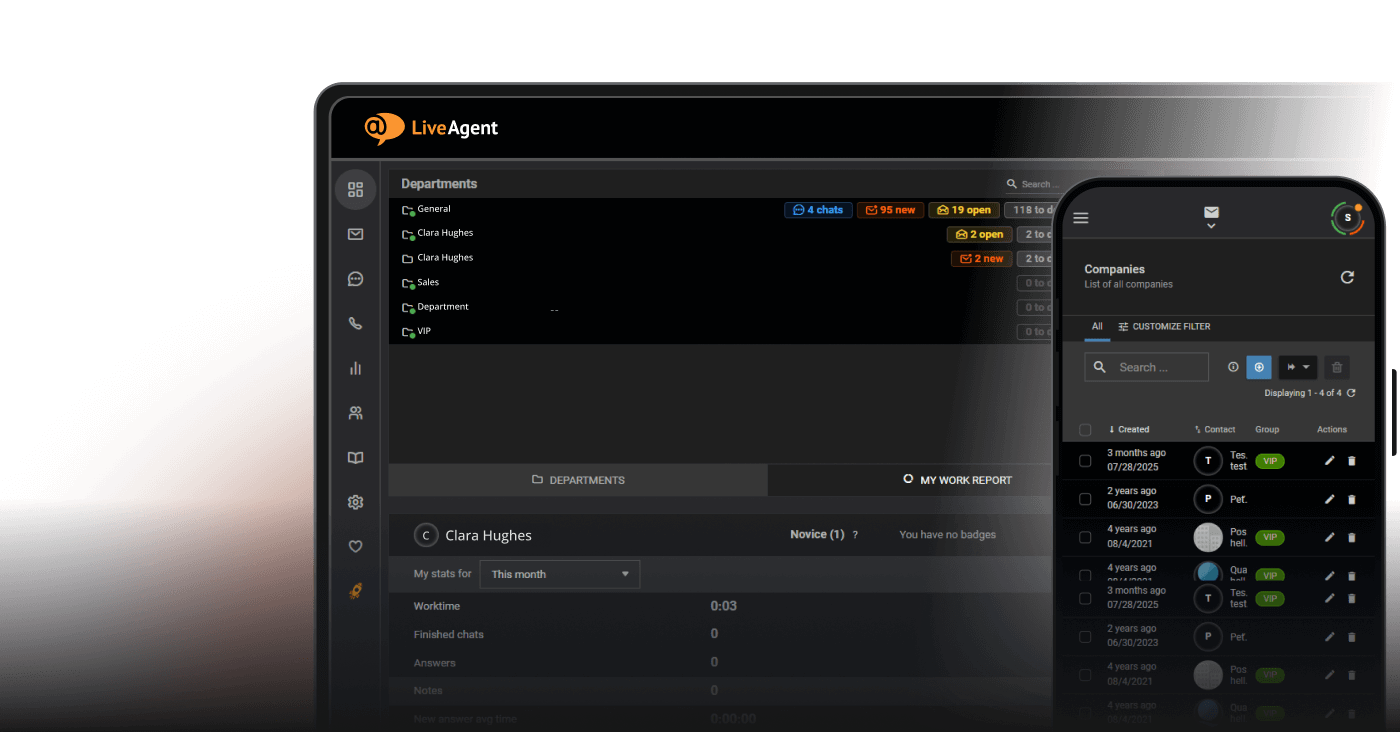
- Navigate to Configuration → Live Chat → Chat Buttons.
- Select the chat button you want to attach the AI Chatbot to and click Edit.
- Open the AI Chatbot tab within the button settings.
- Toggle Enable AI Chatbot to the on position.
- Select your integration source. LiveAgent currently supports the FlowHunt integration for the AI Chatbot. If you have not yet connected FlowHunt, you will be prompted to do so here — you will need your FlowHunt API key.
- Click Save.
Expected outcome: The chat button now routes incoming visitor messages through the AI Chatbot before any human agent sees them. Visitors will not notice a visual change — the widget looks identical.
1b. Enable the AI answer assistant
- Navigate to Configuration → AI → Answer Assistant.
- Choose your AI provider: OpenAI (ChatGPT) or FlowHunt.
- If selecting OpenAI: paste your OpenAI API key into the API key field and click Verify. LiveAgent will confirm the key is valid before saving.
- If selecting FlowHunt: authenticate via your FlowHunt account credentials or API token. The integration will pull your available FlowHunt flows automatically.
- Click Save changes.
Expected outcome: Agents will now see an AI Answer Assistant button inside every ticket reply editor. The button will not appear until this step is complete.
Warning — free setup offer: If you have active subscriptions on both LiveAgent and FlowHunt, the LiveAgent support team will handle the full initial integration setup at no additional cost. Email support@liveagent.com before spending time on manual configuration — this can save hours of trial and error, especially if your FlowHunt flows are complex.
Ready to grow your business?
Start your free trial today and see results within days.
Step 2: configure the AI assistant persona
A generic chatbot that introduces itself as “Bot” erodes trust. Configuring a persona that matches your brand voice is the difference between a tool customers tolerate and one they actively use.
2a. Set the chatbot name and avatar
- Return to Configuration → Live Chat → Chat Buttons and edit the same button from step 1a.
- On the AI Chatbot tab, locate the Bot Name field. Enter the name your customers will see — for example, “Aria from Acme Support” rather than a generic label.
- Upload a bot avatar image. Use a distinct visual (an illustrated character or a branded icon) so customers immediately understand they are speaking with an automated assistant. Transparency builds trust.
- Write a Welcome Message. This is the first thing the bot says. Be explicit: “Hi, I’m Aria, Acme’s AI assistant. I can answer questions about your order, account, or our products. Type your question below.”
- Save the button settings.
2b. Configure the answer assistant tone
- Navigate to Configuration → AI → Answer Assistant.
- Under Tone of Voice, select the default tone agents will see pre-selected when generating a draft: Casual, Neutral, or Business.
- Set the default Formality Level for new ticket drafts. This controls how the assistant phrases responses when generating from scratch — particularly useful for outbound tickets where agents compose the first message.
- Optionally, write Custom Instructions. These are persistent directives the AI follows on every generation: for example, “Always mention our 30-day return policy when discussing refunds” or “Never make promises about delivery timelines.”
- Save your settings.
Expected outcome: Every AI-generated draft will reflect your brand voice by default. Agents can still override tone per ticket, but the default reduces the number of manual adjustments needed.
Step 3: connect your knowledge base
The AI Chatbot is only as useful as the content it can access. Connecting a well-structured knowledge base is the single highest-leverage configuration step in this entire tutorial.
3a. Verify your knowledge base is published
- Navigate to Knowledgebase in the main LiveAgent menu.
- Confirm that the knowledge base you want the AI to use is set to Published (not Draft or Private).
- Review article completeness. Articles that are thin, incomplete, or contain contradictory information will produce poor AI responses. Aim for articles that each answer one specific question thoroughly.
3b. Link the knowledge base to the AI chatbot
- Go back to the AI Chatbot settings inside your chat button (Configuration → Live Chat → Chat Buttons → Edit → AI Chatbot).
- Under Knowledge Source, select the knowledge base(s) the chatbot is permitted to reference. You can assign multiple knowledge bases if you operate in several product areas or languages.
- Enable Multilingual support if your audience is international. The AI Chatbot supports over 100 languages, including less commonly spoken ones — it detects the visitor’s language automatically and responds in kind, without requiring separate bot configurations per language.
- Save the button settings.
3c. Identify and fill knowledge gaps
After your first week of live operation, review the Unanswered Questions report (covered in the monitoring section below). Every question the bot could not answer is a missing knowledge base article. Treat this report as your content backlog.
Expected outcome: The AI Chatbot can now interpret visitor questions, search your knowledge base, and return accurate, sourced answers — without any human involvement for common queries.
Join our newsletter
The latest tips and deals delivered straight to your inbox.
Step 4: set up escalation to human agents
No AI handles every situation correctly. A well-defined escalation path is not a fallback — it is a core feature of a production-ready AI virtual assistant setup. Customers who reach a human quickly after the bot fails are more satisfied than customers who never spoke to the bot at all.
4a. Configure automatic escalation triggers
- Inside the AI Chatbot settings, locate the Escalation Rules section.
- Enable Escalate when the bot cannot answer. This triggers a handoff when the AI cannot find a relevant answer in the knowledge base after a configurable number of attempts (typically two).
- Enable Escalate on visitor request. Always allow visitors to type phrases like “speak to a human” or “talk to an agent” to exit the bot flow immediately.
- Set the Escalation Department. Route escalated chats to a specific department (for example, Level 1 Support) rather than the general queue. This prevents escalated conversations from getting lost.
- Write an Escalation Message — the text the bot displays before handing off: “I’m connecting you with a support specialist now. Average wait time is under 3 minutes.” Setting expectations reduces abandonment.
4b. Configure lead capture for purchase-intent visitors
- In the same Escalation Rules section, enable Proactive Lead Capture.
- Define the trigger condition: activate when a visitor asks purchase-related questions (pricing, trial, upgrade) or when the bot has failed to answer and the visitor remains on the page.
- Configure the lead capture form fields: at minimum, collect Name and Email. Avoid asking for more than three fields — form length directly correlates with abandonment rate.
- Route captured leads to your CRM or to a dedicated LiveAgent department for sales follow-up.
- Save all escalation settings.
Expected outcome: Complex queries reach a human agent within seconds. Purchase-intent visitors who would otherwise leave silently are now captured as leads. No conversation ends in a dead end.
Step 5: run a test conversation
Never push an AI configuration live without testing it first. Use the checklist below to validate every critical behavior before your customers encounter it.
5a. Use LiveAgent’s built-in chat preview
- Navigate to Configuration → Live Chat → Chat Buttons and click Preview on your configured button.
- A test chat window opens in your browser. This is a live simulation — messages sent here pass through the actual AI Chatbot logic.
- Work through each scenario in the testing checklist below. Log results as Pass or Fail.
5b. Testing checklist
Run every scenario in the table below. Do not mark the configuration as production-ready until all scenarios pass.
| Test scenario | Expected AI behavior | Pass / fail criteria |
|---|---|---|
| Ask a question directly covered by a published knowledge base article | Bot returns an accurate answer sourced from the article within 5 seconds | Pass: Answer is factually correct and matches article content. Fail: Answer is wrong, hallucinated, or the bot says it doesn’t know. |
| Ask a question not covered by any knowledge base article | Bot acknowledges it cannot answer and triggers escalation to a human agent | Pass: Escalation message appears and chat is routed to the correct department. Fail: Bot invents an answer or conversation ends with no handoff. |
| Type “I want to speak to a human” mid-conversation | Bot immediately acknowledges the request and initiates handoff without asking follow-up questions | Pass: Handoff begins within one bot response. Fail: Bot continues trying to answer or loops back to the menu. |
| Ask a question in a language other than English (e.g., German, Japanese, or Arabic) | Bot detects the language and responds in the same language using the knowledge base content | Pass: Response is in the visitor’s language and content is accurate. Fail: Bot responds in English or returns an error. |
| Simulate purchase intent (e.g., “How much does the Pro plan cost? I’m ready to buy.”) | Bot answers the pricing question and, if lead capture is configured, prompts for contact details or routes to a sales agent | Pass: Pricing answer is correct and lead capture or sales escalation triggers. Fail: Bot answers and ends conversation with no follow-up action. |
| Open an existing ticket and use the Answer Assistant to generate a draft reply | Assistant generates a contextually relevant draft based on the ticket thread in the configured tone of voice | Pass: Draft is coherent, matches ticket context, and reflects the configured tone. Fail: Draft is generic, off-topic, or the button is missing from the editor. |
| Use the Answer Assistant to modify an existing draft (refine mode) | Assistant rewrites or improves the existing draft text while preserving the original intent and tone | Pass: Modified draft is an improvement on the original and does not introduce factual errors. Fail: Draft is replaced with unrelated content or the feature returns an error. |
5c. Fix and retest
For every Fail result: identify the root cause (missing knowledge base article, incorrect escalation rule, misconfigured API key), fix it, and rerun only the failed scenario. Do not rerun the full checklist unless you have made changes that could affect multiple scenarios.
Monitoring AI performance in LiveAgent reports
Deploying the AI Chatbot is not a set-and-forget action. Performance degrades as your product evolves and customer questions change. Build a weekly review habit using LiveAgent’s native reporting tools.
Key metrics to track
- Chatbot Resolution Rate: The percentage of conversations the AI resolved without escalation. A healthy baseline for most support teams is 40–60% in the first month, rising as you fill knowledge base gaps.
- Escalation Rate: The inverse of resolution rate. A persistently high escalation rate (above 70%) signals that your knowledge base is incomplete or the bot’s confidence threshold is set too high.
- Unanswered Questions Log: LiveAgent logs every question the bot could not answer. Review this list weekly and convert the top entries into new knowledge base articles. This is the fastest way to improve bot performance.
- Average Chat Duration (bot vs. human): If bot-handled chats take significantly longer than human-handled ones, your welcome message or question interpretation may be creating unnecessary back-and-forth.
- Lead Capture Conversion Rate: Of visitors who triggered the lead capture form, how many submitted it? Below 20% suggests the form is too long or appears at the wrong moment in the conversation.
- Answer Assistant Usage Rate: Track how frequently agents click the AI Answer Assistant button. Low usage after the first two weeks suggests agents need additional training or the draft quality is not meeting their expectations.
Where to find these reports
- Navigate to Reports in the main LiveAgent navigation.
- Select Chat Overview for aggregate chatbot and live chat metrics.
- Use the Tags filter to isolate AI-escalated tickets if you have configured your escalation rules to auto-tag conversations on handoff (recommended).
- Export weekly data to a spreadsheet and track trend lines — a single week of data is rarely meaningful, but a four-week trend tells you clearly whether your knowledge base improvements are having an effect.
Ongoing optimization cadence
- Weekly: Review unanswered questions log. Publish at least two new knowledge base articles based on real bot failures.
- Monthly: Review escalation rate trend. Adjust the bot’s confidence threshold if escalation rate is moving in the wrong direction.
- Quarterly: Audit custom instructions in the Answer Assistant. As your policies and products change, outdated instructions produce outdated drafts.
- On product launches: Add knowledge base articles before the launch date, not after. Proactive content prevents a spike in unanswered questions on launch day.
If you want hands-on help with ongoing optimization — particularly around FlowHunt flow design — the LiveAgent support team is available at support@liveagent.com . Customers with active subscriptions on both LiveAgent and FlowHunt can access free setup and configuration assistance.
Everything covered in this tutorial is available on LiveAgent’s current plans — no enterprise contract required. Set up your AI Chatbot, activate the Answer Assistant, and start deflecting repetitive tickets from day one.