



TLDR
SLA management in LiveAgent has two parts. Create an SLA level in Configuration > Automation > SLA to set time limits, then create an SLA rule that gives that level to the right tickets. Follow SLA times on each ticket, and review every SLA breach in the SLA log and the SLA compliance report.
What is SLA management?
SLA management means setting response and resolution time goals and checking that your team meets them. SLA stands for service level agreement. In support, it is a promise about how fast you will answer a customer.
When you miss a goal, that is an SLA breach. Tracking breaches shows you where your team is too slow, so you can fix it before customers complain. You can read more in our short guides on what an SLA is and SLA violations .
How does SLA work in LiveAgent?
LiveAgent uses two building blocks: an SLA level and an SLA rule. The level holds the time limits. The rule applies the level to tickets.
| SLA level | SLA rule | |
|---|---|---|
| What it is | A named set of time limits, for example “first answer in 1 hour” | An automation that checks conditions, such as ticket tags |
| What it does | Holds the time limits and can use business hours and holidays | Changes the SLA level of a ticket when the conditions match |
| When it works | Applies to tickets that have the level | Runs when a ticket is created |
SLA rules only run when a ticket is created. If you need an SLA on a ticket later, use Rules or Time rules to change the SLA level.
LiveAgent gives you these SLA types:
| SLA type | What it measures |
|---|---|
| First answer | How fast an agent answers a new ticket |
| Next answer | How fast an agent answers again, for example after a ticket is reopened |
| First assign | How fast a ticket is assigned to an agent |
| First resolve | How fast a ticket is resolved |
| Chat answer | How fast a chat is picked up, including time in the queue |
| Call answer | How fast a call is picked up, including time in the queue |
Chat answer and Call answer are the SLA types for live channels. You can read the full feature overview on our SLA feature page .
Step 1: How do you create an SLA level?
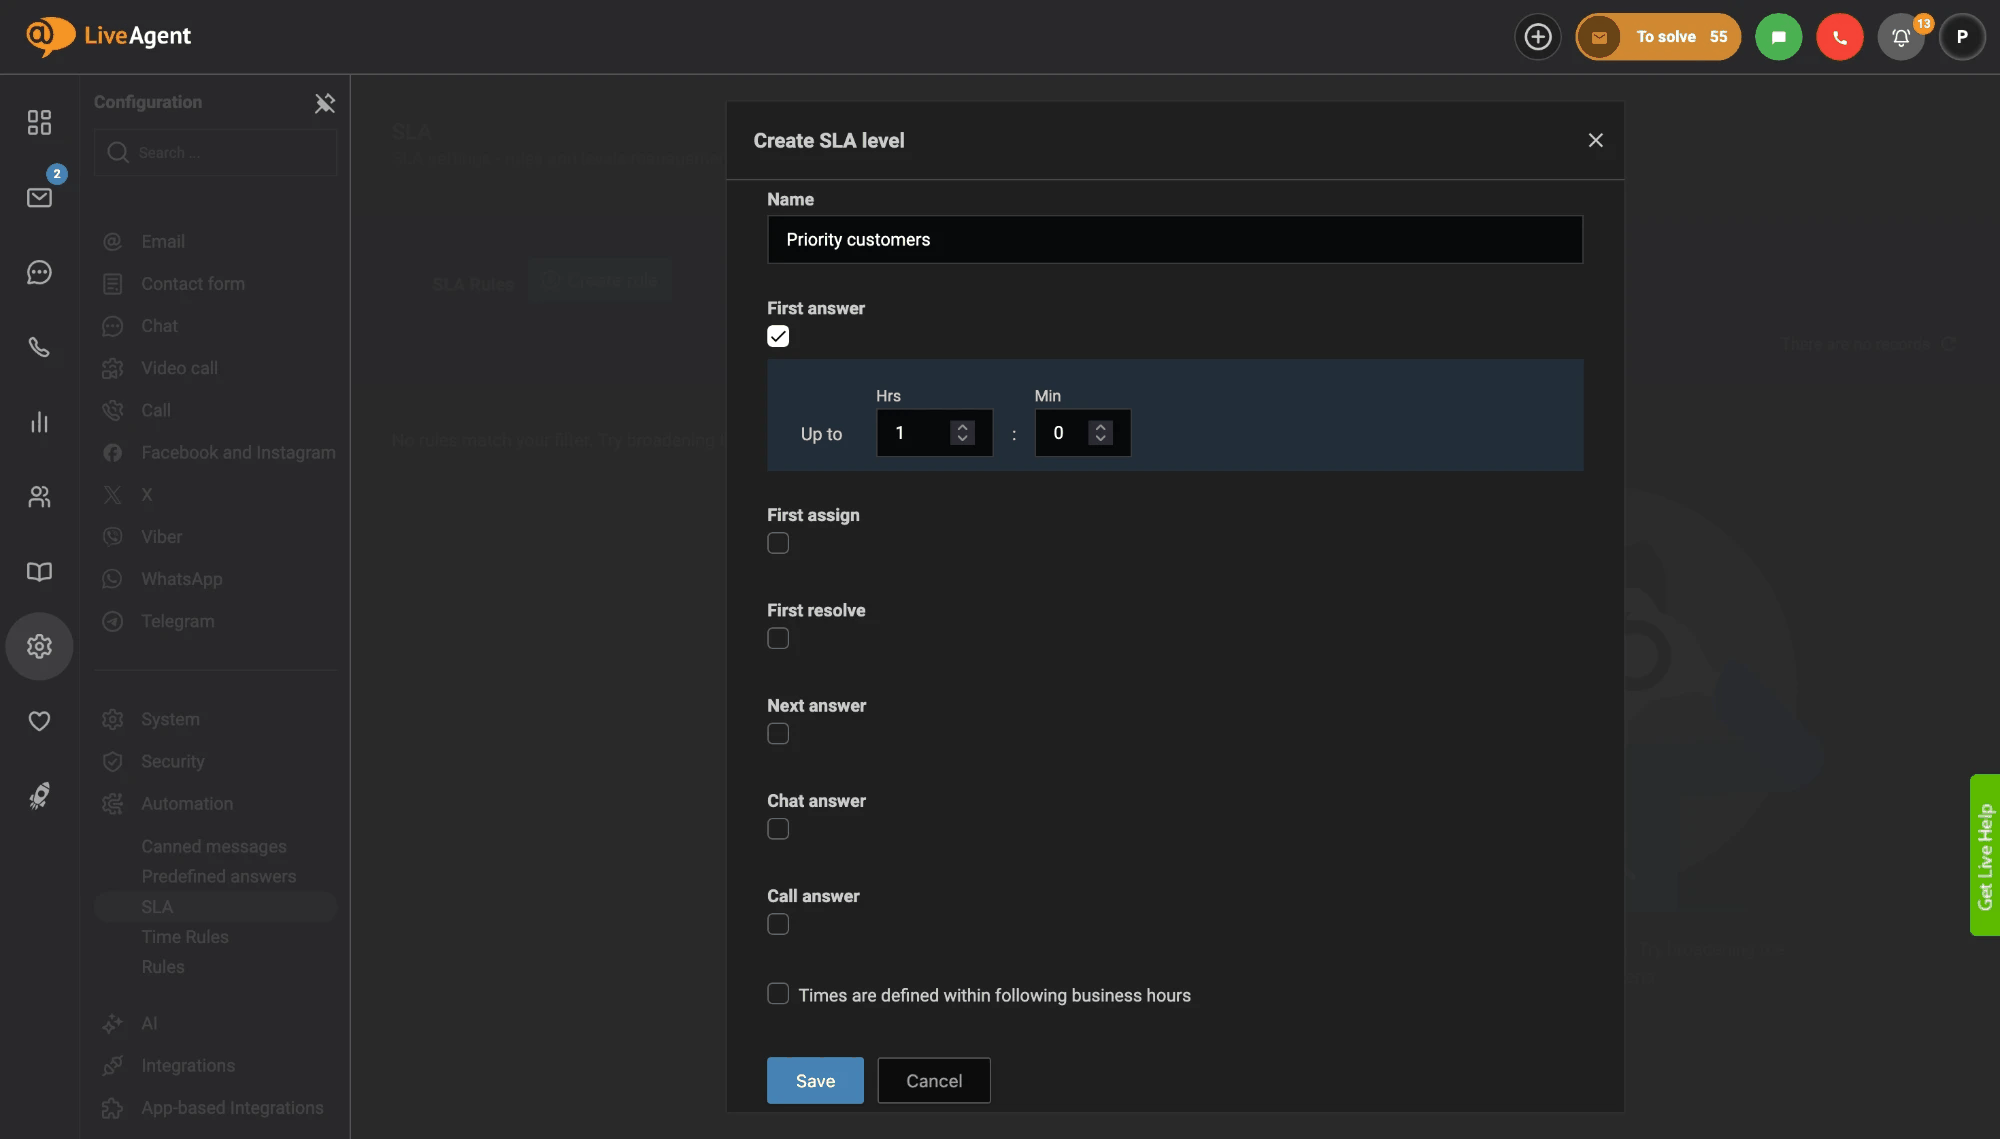
Go to Configuration > Automation > SLA, click Create Level, name the level and set the time limits. Create one level for each promise you make to customers. Follow these steps:
- Go to Configuration > Automation > SLA.
- Click Create Level.
- Enter a unique name, for example “Priority Customers”.
- Tick each SLA type you need, such as First answer, and set its time in the Up to field in hours and minutes. For example, first answer up to 1 hour.
- If the times should count only during working hours, tick Times are defined within following business hours. Our business hours feature explains how they work.
- Click Save.
Business hours and holidays change how the timer runs. The timer does not pause outside business hours; instead, the due time is extended by the time outside business hours. Check your settings before you rely on them.

Join our newsletter
The latest tips and deals delivered straight to your inbox.
Step 2: How do you create an SLA rule?
Go to Configuration > Automation > SLA, click Create Rule, add a condition and the action change SLA level. The rule gives your SLA level to the right tickets, and without a rule the level is not applied. Follow these steps:
- Go to Configuration > Automation > SLA.
- Click Create Rule.
- Enter a unique name, for example “Urgent tickets”.
- Add a condition. For example: if ticket tags contain the tag “urgent”.
- Add the action change SLA level and pick the SLA level from step 1.
- Save the rule.
SLA rules can use many conditions, such as the ticket source, status, priority, department, tags, customer group and custom fields. The actions are change SLA level and Stop other rules.
Remember: SLA rules run when a ticket is created. A ticket that already exists will not get the level from a new SLA rule.
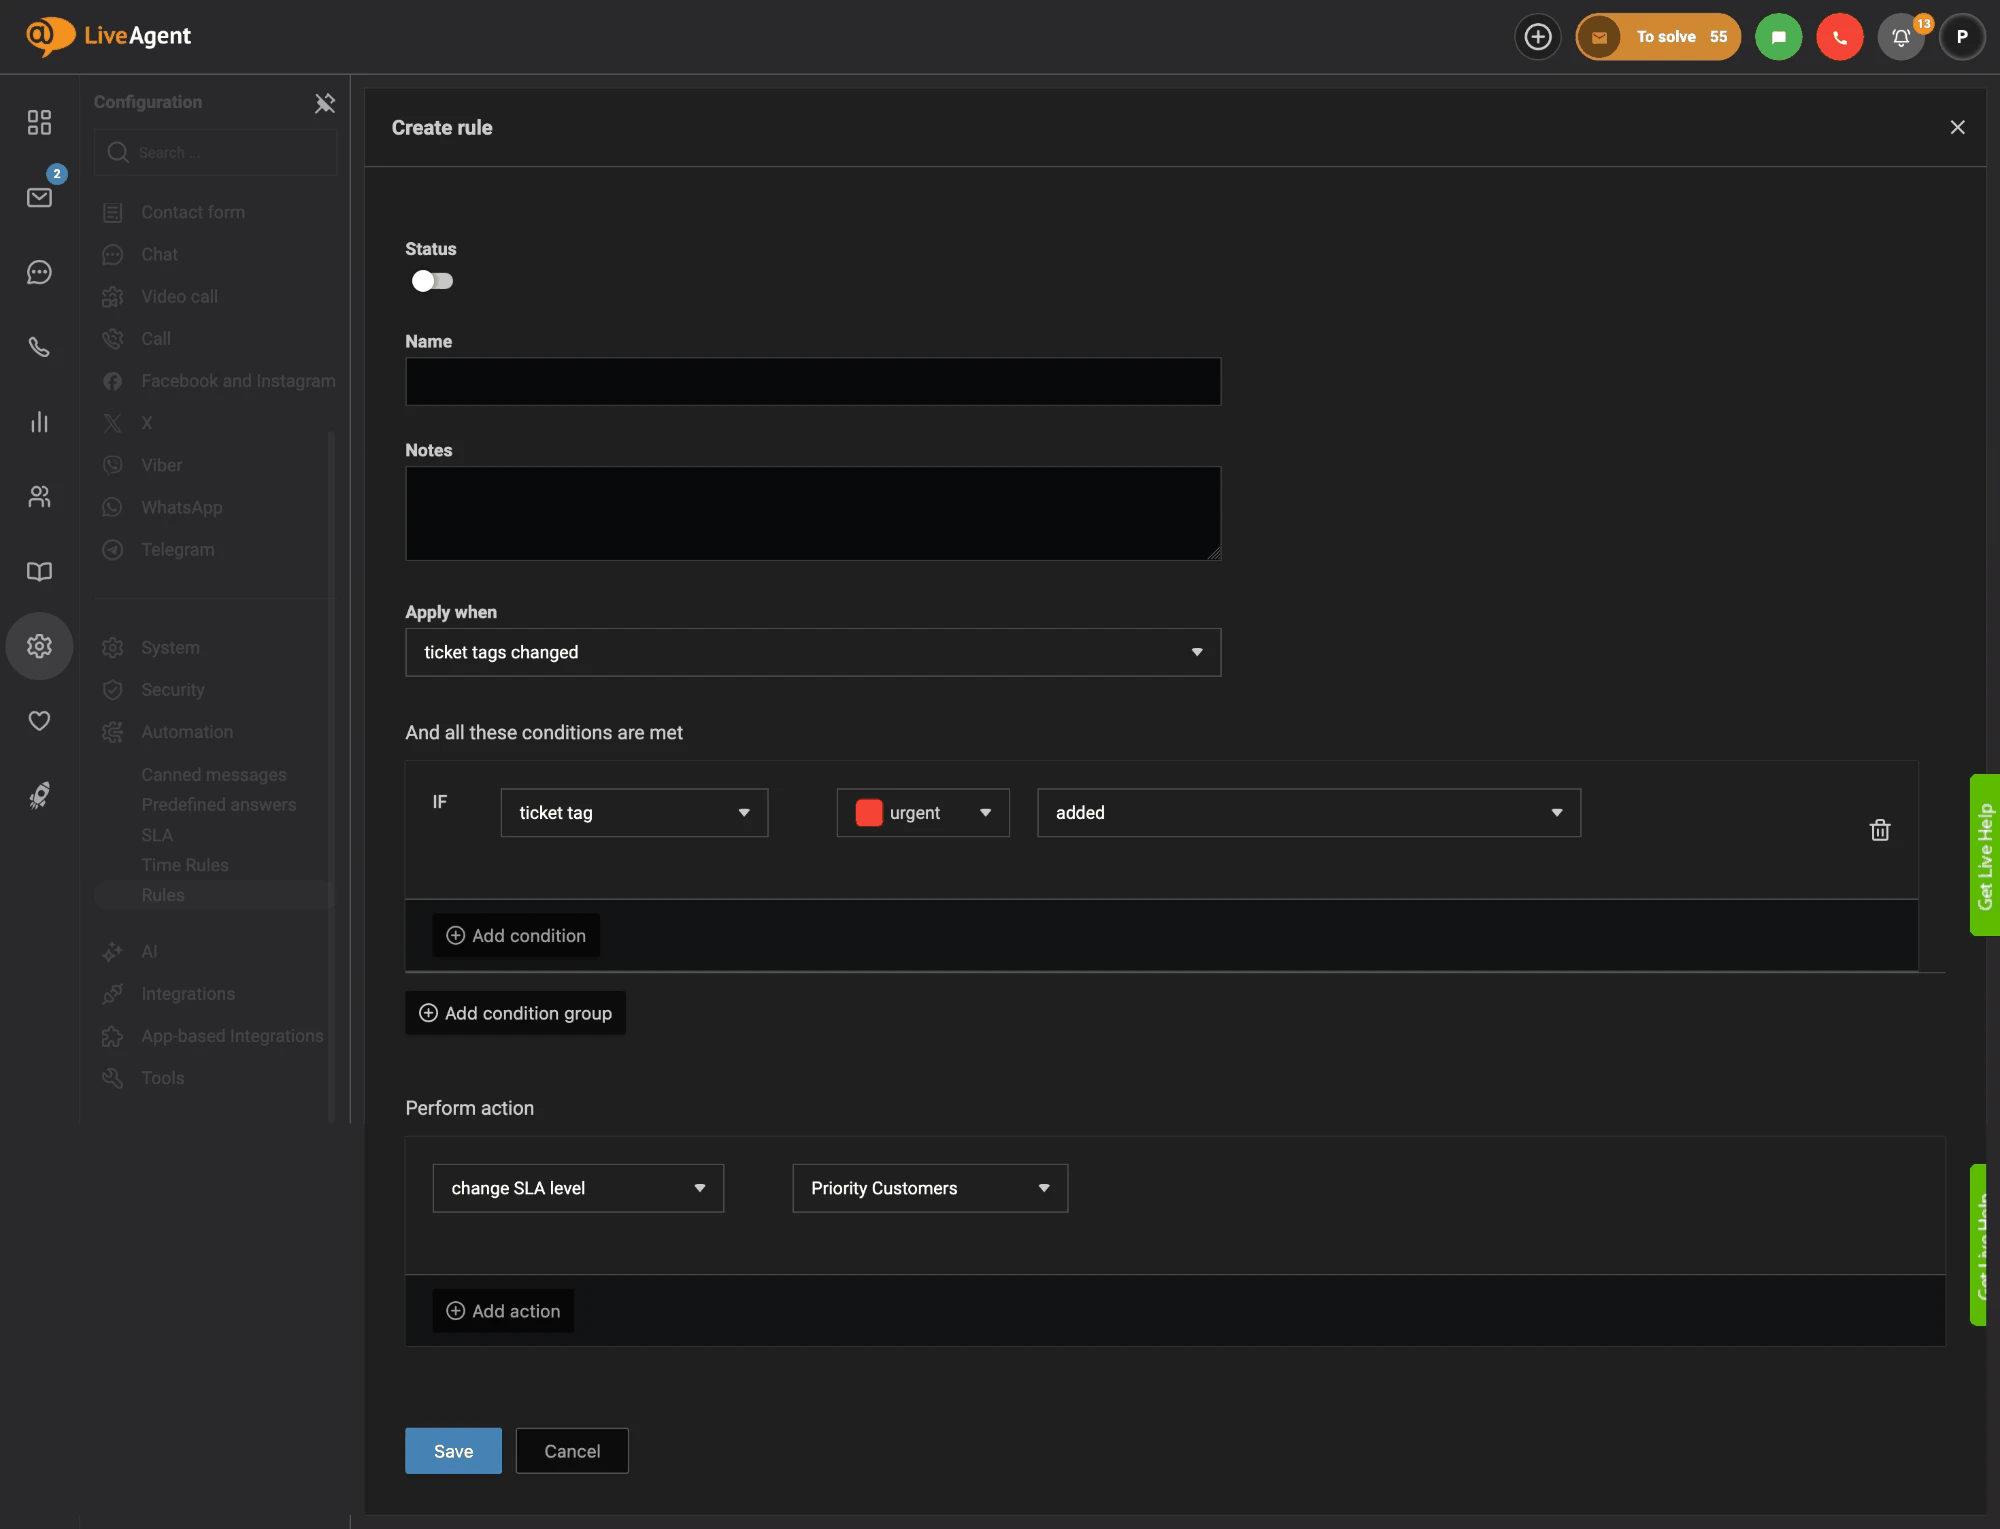
To change the SLA level later, create a rule in Configuration > Automation > Rules. For example, set Apply when to “ticket tags changed”, add the condition “ticket tag urgent added” and the action change SLA level to Priority Customers.
Step 3: How do you track SLA times on a ticket?
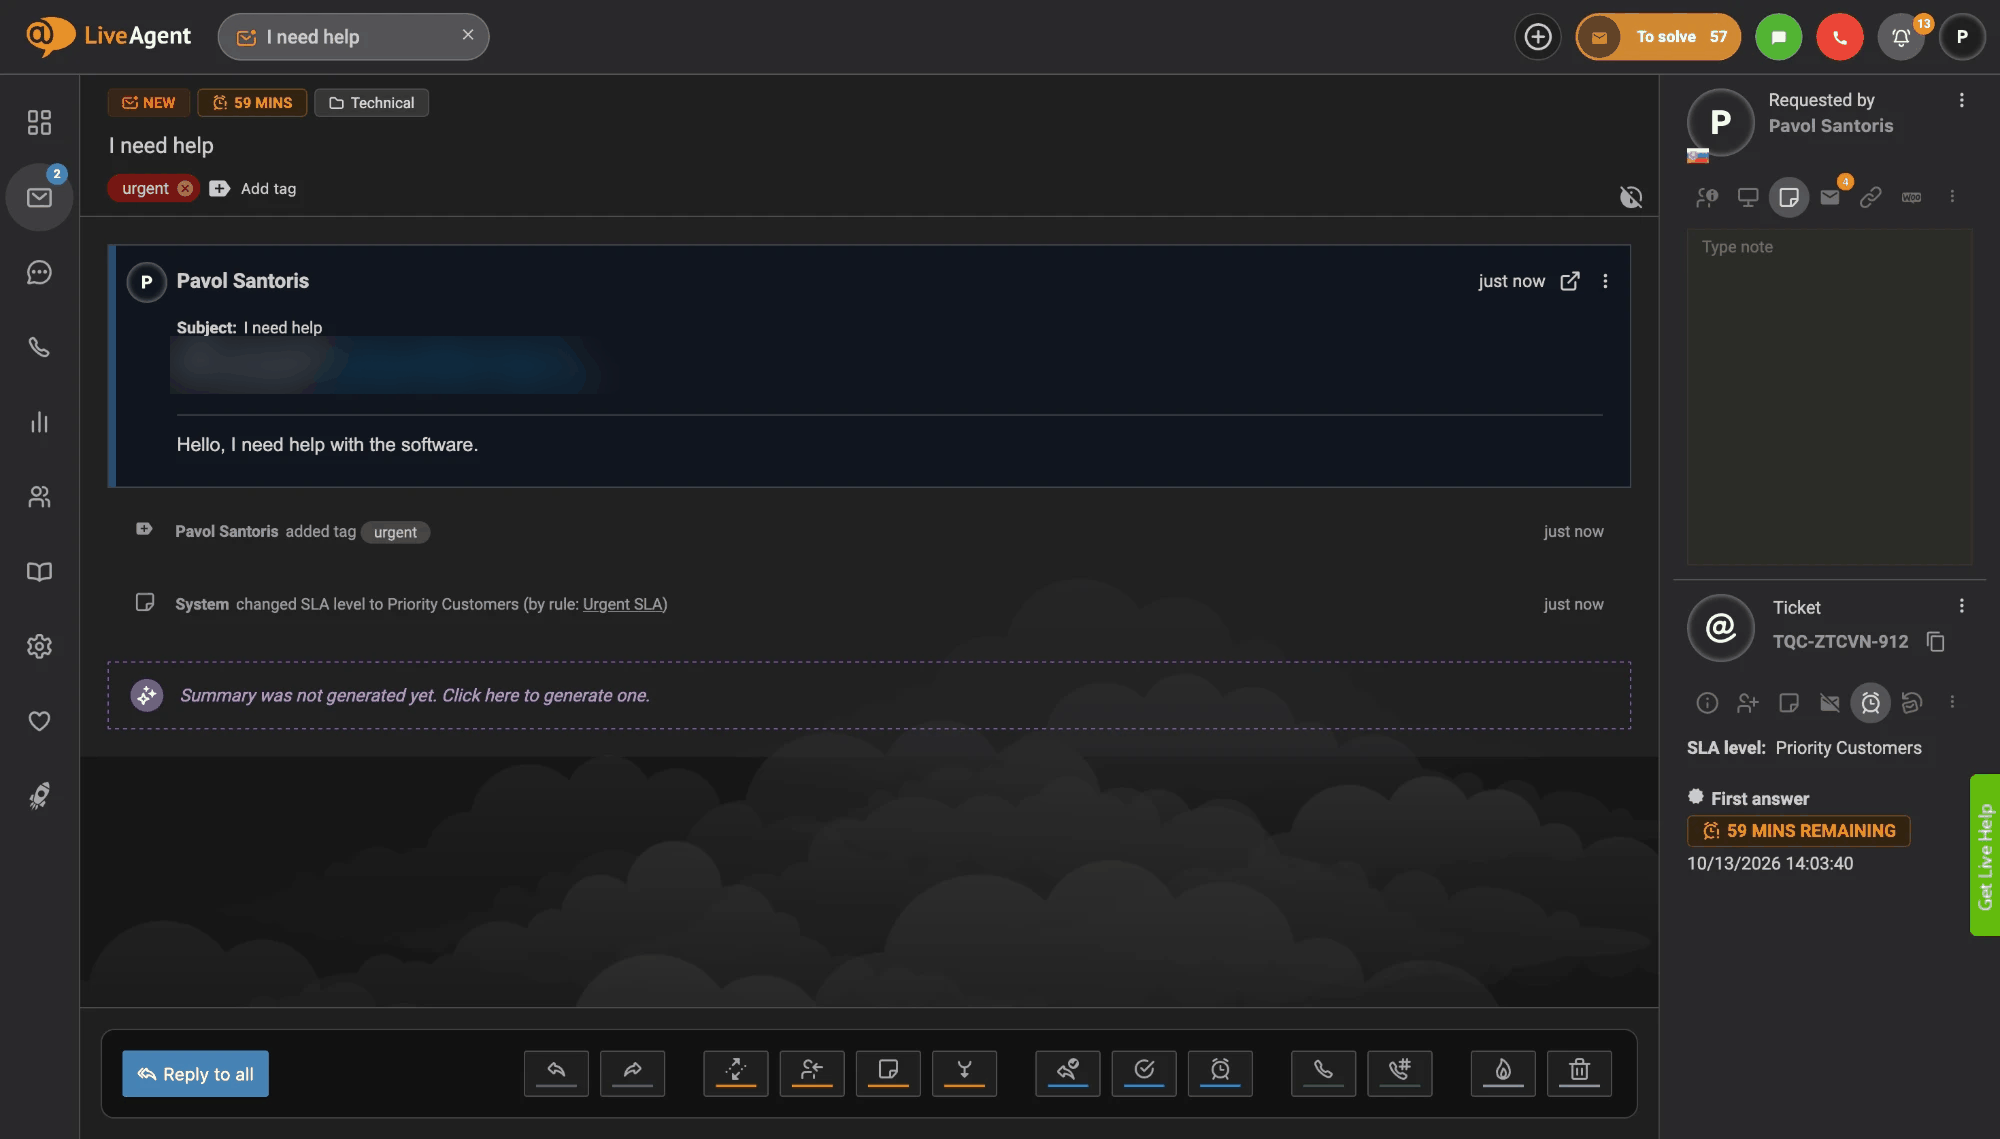
Open the ticket and look at the Ticket section in the right panel. It shows the SLA level and the time left for each SLA type, for example “First answer: 59 mins remaining”. This is where SLA tracking starts.
The same countdown appears at the top of the ticket, next to its status. The ticket history also notes when a rule changed the SLA level.
SLA times also affect how tickets are sorted by importance in the Tickets grid. This helps agents work on the most urgent tickets first.
If a ticket has no SLA level, LiveAgent still keeps an internal answer time of 7 days for it.
Step 4: How do you track SLA breaches?
Use the SLA log and the SLA compliance report. Find both in the Reports section, under Tickets, Chats and Calls. The log lists each closed SLA, and the report shows fulfilled and missed SLAs for a period.
SLA log. The SLA log lists each closed SLA type that was applied to a ticket. For every entry you can see the requester, ticket ID, department, agent, level, when the SLA started, the due date, when it was closed, the SLA type and the SLA status. Only SLAs that were fulfilled and closed, or not fulfilled, appear here. SLAs that are still running do not. Read more on the SLA log report page .
SLA compliance report. This report shows general statistics about fulfilled and missed SLAs for a time period. You can sort the results by department, agent and date. Read more on the SLA compliance report page .
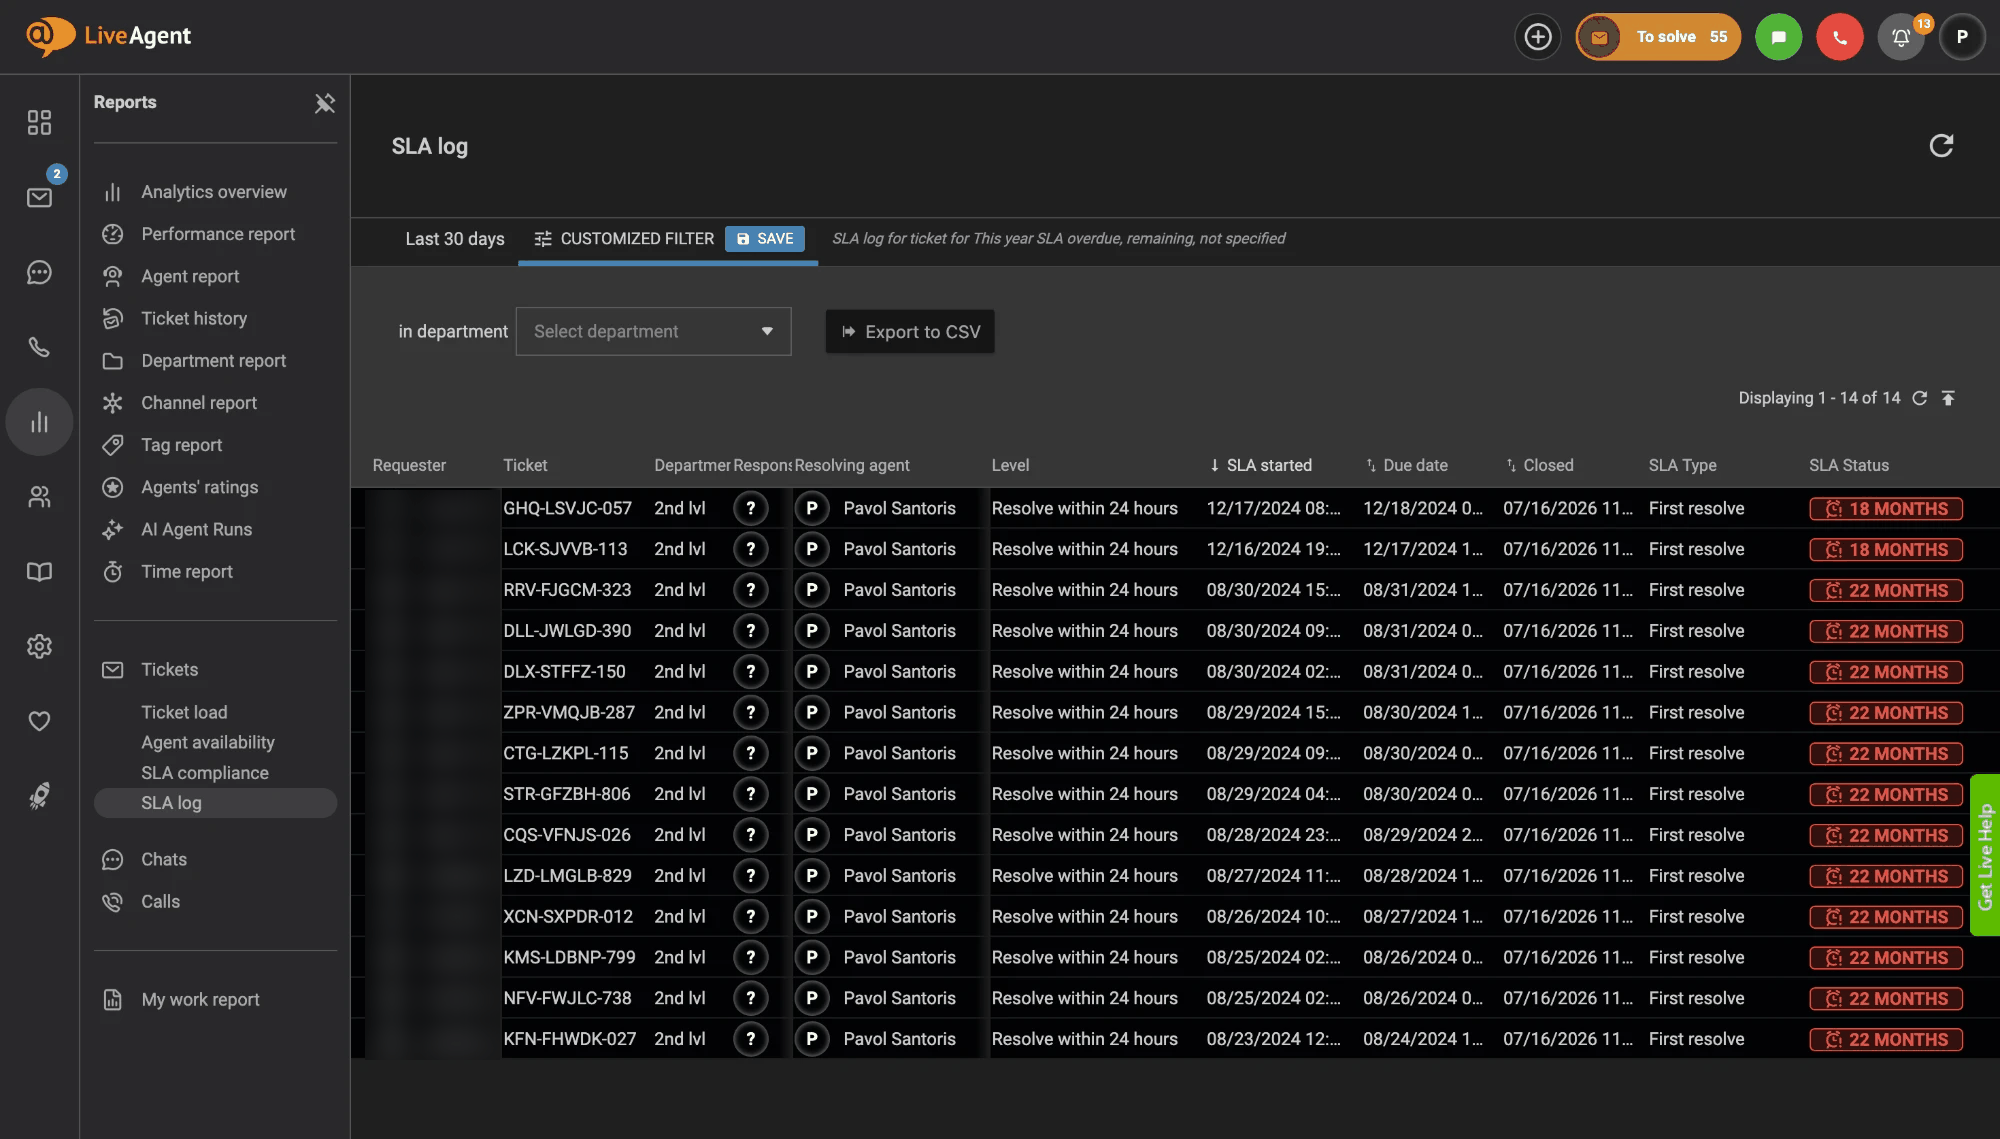
In the SLA log, choose a time range and a department, then click Export to CSV if you need the data elsewhere. You can export both the SLA log and the SLA compliance report to a CSV file. Use this to share results with your team or to build your own charts.
For more on reports, see our guide to customer service reports and the reports feature page .
What are the best tips for SLA management?
- Start small. Begin with one or two levels, such as one for urgent tickets and one for everyone else. Add more later.
- Use clear names. Names like “Priority Customers, first answer 1 hour” make rules easy to read. Each name must be unique.
- Plan for later changes. Because SLA rules only run on new tickets, use Rules or Time rules when you need to change the SLA level of existing tickets.
- Check every SLA breach each week. Open the SLA log, find the tickets that missed their SLA and look for a pattern, such as one department or one time of day. Weekly SLA tracking keeps small problems from growing.
- Match your promise. Set time limits your team can really meet. A goal that is always missed does not help anyone.
- Review ticket habits. Our guide on ticketing system best practices has more ideas to help agents answer faster.
Sources
This page follows LiveAgent’s support documentation, checked on October 13, 2026: SLA overview , How to set up SLA in LiveAgent , SLA log and Reports section overview .
Next step
Create your first SLA level and one SLA rule today, then check the SLA log after a week. You will see quickly where your team keeps its promises and where it needs help. Not a LiveAgent user yet? Start your free trial and set up SLA management on your own tickets.